In the ever-evolving digital landscape, understanding how your audience interacts with your blog is crucial. Google Analytics 4 (GA4) has emerged as a powerful tool that offers deeper insights into user behavior compared to its predecessor, Universal Analytics. If you’re looking to measure the performance of your blog effectively, setting up GA4 is an essential step.
This guide will walk you through the entire process of installing and configuring Google Analytics 4 for your blog. Whether you’re using WordPress, Wix, Webflow, or another platform, we’ve got you covered. By the end of this article, you’ll have a solid foundation in GA4 and be able to track your blog’s performance like a pro.
What Is Google Analytics 4 and Why It Matters
Google Analytics 4 is the latest iteration of Google’s analytics platform, designed to provide a more comprehensive view of user interactions across multiple devices and platforms. Unlike Universal Analytics, which focused primarily on page views, GA4 tracks events—such as clicks, scrolls, video engagement, and form submissions—that give you a clearer picture of how users interact with your content.
GA4 also integrates seamlessly with other Google tools like Google Ads and Firebase, making it easier to connect your marketing efforts. With the upcoming deprecation of Universal Analytics by July 2023, transitioning to GA4 is not just recommended—it’s necessary.
By implementing GA4, you gain access to advanced features such as enhanced measurement, predictive metrics, and cross-platform tracking, all of which can significantly enhance your SEO strategy and content optimization efforts.
How Google Analytics 4 Impacts SEO Performance
GA4 plays a pivotal role in modern SEO strategies. Here are a few key ways it impacts your blog’s performance:
-
User Engagement Metrics: GA4 provides detailed insights into how users engage with your content, including time spent on pages, bounce rates, and scroll depth. These metrics help you understand what content resonates with your audience.
-
Conversion Tracking: With event-based tracking, you can monitor specific actions users take, such as signing up for a newsletter or downloading a resource. This helps you optimize your blog for conversions.
-
Audience Insights: GA4 allows you to segment your audience based on behavior, demographics, and device usage. This data is invaluable for tailoring your content and improving user experience.
-
Cross-Platform Tracking: As more users access content via mobile, desktop, and even voice assistants, GA4 ensures you get a unified view of your audience across all platforms.
These insights enable you to make data-driven decisions that can boost your blog’s visibility, engagement, and overall performance.
Step-by-Step Implementation Framework
Setting up Google Analytics 4 involves several steps. Follow this framework to ensure a smooth installation and configuration process.
1. Create a Google Analytics 4 Property & Data Stream
Start by logging into your Google Analytics account. If you don’t have one, sign up using your Google account.
- Go to the Admin section (bottom-left corner).
- Click Create Property.
- Enter a name for your property (e.g., “My Blog”).
- Select your country, reporting time zone, and currency.
- Choose Get baseline reports for simplicity.
- Click Create.
Next, set up a data stream:
- In the Property section, click Data Streams.
- Select Web and enter your website URL.
- Enable Enhanced Measurement to automatically track events like page views, scrolls, and outbound clicks.
- Click Create Stream.
2. Install Google Analytics 4
There are three main methods to install GA4: using a plugin, the native tracking code, or Google Tag Manager (GTM).
Option 1: Install with a Plugin
If you’re using a CMS like WordPress, Squarespace, or Shopify, look for plugins that support GA4 integration.
- For WordPress, use plugins like GA4WP or MonsterInsights.
- After installing the plugin, enter your Measurement ID (found in your GA4 property settings).
- Save your changes and test the installation.
Option 2: Install with the Native Tracking Code
If your site doesn’t support GA4 plugins, ask your developer to add the tracking code manually.
- Go to Admin > Data Streams.
- Click View tag instructions.
- Copy the JavaScript snippet.
- Paste it immediately after the
<head>tag on every page of your website.
Option 3: Install with Google Tag Manager
For more flexibility, use GTM:
- Install Google Tag Manager on your site.
- In GA4 > Admin > Data Streams, copy your Measurement ID.
- In GTM, create a new tag for Google Analytics: GA4 Configuration.
- Enter the Measurement ID and set the trigger to All Pages.
- Preview and publish your changes.
3. Check the DebugView in Google Analytics 4
Once installed, verify that GA4 is working correctly.
- Go to Admin > DebugView.
- If using a plugin or native code, install the Google Analytics Debugger extension in Chrome.
- Visit your blog and check if events appear in DebugView.
- If using GTM, enable Preview Mode to see real-time data.
4. Publish Your Changes in Google Tag Manager
If you used GTM, ensure your changes are published:
- Click Submit in GTM.
- Complete the publishing steps.
- Wait a few minutes for data to appear in Real-Time reports.
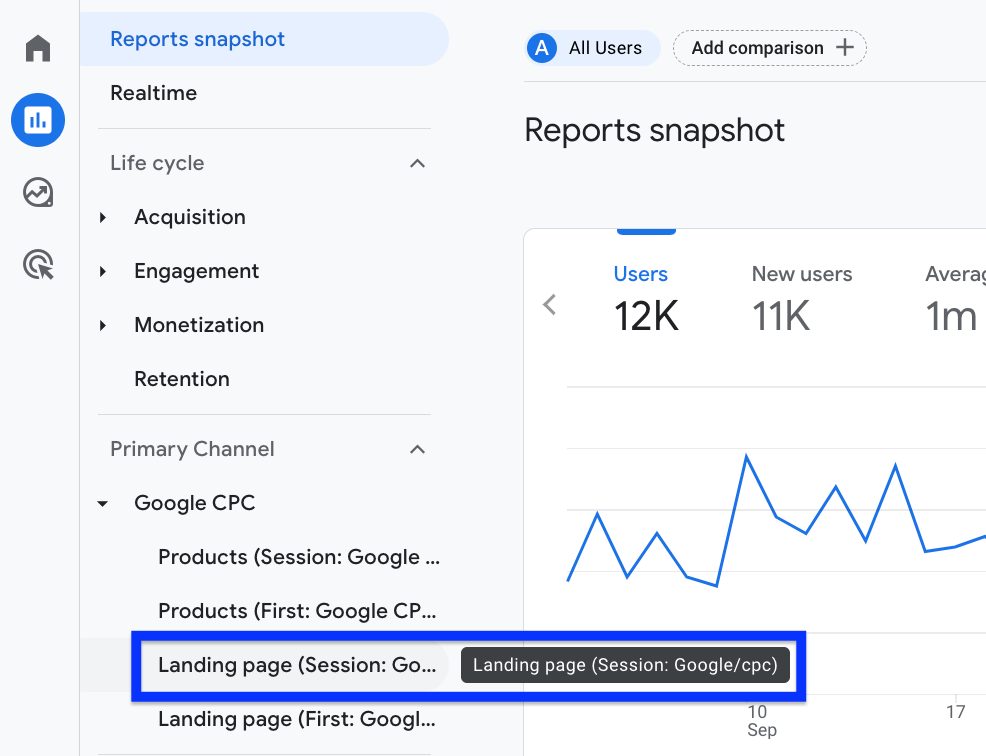
5. Use Google Analytics 4 Real-Time Reports
Check the Real-Time section in GA4 to see live data:
- View traffic sources, active users, and recent events.
- Click View User Snapshot to see individual user activity.
- Use this to confirm that GA4 is collecting data accurately.
Real or Hypothetical Case Study
Let’s imagine a scenario where a blogger named Sarah wants to improve her blog’s performance. She sets up GA4 and starts tracking user behavior.
After a month, she notices that:
- Bounce rate is high on her homepage.
- Scroll depth is low on long-form articles.
- Conversion rate for newsletter sign-ups is below average.
Using GA4, Sarah identifies that users are not engaging with her content deeply. She adjusts her content strategy, adds more interactive elements, and improves her call-to-action buttons. Within two months, her bounce rate drops by 20%, scroll depth increases by 30%, and newsletter sign-ups rise by 15%.
This example illustrates how GA4 can directly impact your blog’s performance when used strategically.
Tools and Techniques for Google Analytics 4
Here are some of the best tools to enhance your GA4 experience:
- Google Tag Manager (GTM) – For managing tags and tracking events without coding.
- MonsterInsights – A popular WordPress plugin for GA4 integration.
- GA4WP – Another reliable WordPress plugin for GA4 setup.
- Google Analytics Debugger – A browser extension to test GA4 tracking.
- Hotjar – For heatmaps and user behavior analysis (complements GA4).
Each tool serves a unique purpose, helping you gather and analyze data more effectively.
Future Trends and AI Implications
As AI continues to shape the future of SEO, GA4 is well-positioned to integrate with emerging technologies. Features like AI-powered insights and predictive analytics are already being rolled out, offering bloggers deeper understanding of their audience.
With the rise of voice search and multimodal content, GA4’s ability to track cross-platform interactions becomes even more critical. Staying ahead means embracing these trends and leveraging GA4’s capabilities to adapt your content strategy accordingly.
Key Takeaways
- Understand GA4: It’s a powerful tool for tracking user behavior and optimizing your blog.
- Set Up Correctly: Follow the step-by-step guide to install GA4 using plugins, native code, or GTM.
- Monitor Performance: Use DebugView and Real-Time reports to ensure everything is working.
- Leverage Insights: Use GA4 data to improve engagement, conversions, and content strategy.
- Stay Ahead: Embrace AI and future trends to keep your blog competitive.
By following this guide, you’ll not only set up GA4 but also unlock valuable insights that can elevate your blog’s performance in 2025 and beyond.
Meta Title: How to Set Up Google Analytics 4 for Your Blog
Meta Description: Learn how to set up Google Analytics 4 for your blog with our step-by-step guide. Track user behavior, optimize content, and boost performance.
SEO Tags (5): Google Analytics 4, Blog Analytics, Website Tracking, SEO Tools, Digital Marketing
Internal Link Suggestions:
– [Parameter #1]: Understanding User Behavior with Google Analytics
– [Parameter #2]: Optimizing Content with SEO Analytics
– [Parameter #3]: Advanced SEO Strategies for Blogs
External Source Suggestions:
– https://support.google.com/analytics
– https://www.wordfence.com/blog/2023/06/google-analytics-4-guide/
– https://www.screamingfrog.co.uk/google-analytics/